
This Hyper-V lab should be suitable for learning/testing multiple technologies in Windows Server 2019 and/or Windows Server 2022 and other things besides.
Disclaimer: While all the steps here have been tested to work, some additional troubleshooting and tweaking may be necessary. The information is provided here in good faith.
Hardware:The following physical hardware is recommended as a minimum. Any less than this will require you to adjust the virtual machine specifications down:
Prerequisites:
o This can be enabled in the computer’s BIOS by enabling Intel Virtualization Technology (also known as Intel VT), and Intel VT for DirectI/O (aka VT-d)or AMD-V, depending on the brand of the processor.
o SLAT is also called “Rapid Virtualization Indexing (RVI)”, and has been known as Extended Page Tables (EPT) by Intel and Nested Page Tables (NPT) by AMD.
o To test your machine for SLAT support, download coreinfo.exe from Microsoft Sysinternals and use the coreinfo -v switch to list the features.
An asterisk next to a feature indicates that it is supported whereas a minus sign indicates that the feature is not supported.
You could also run systeminfo.exe from the command line and check the line that says Hyper-V Requirements:. It should read: A hypervisor has been detected.
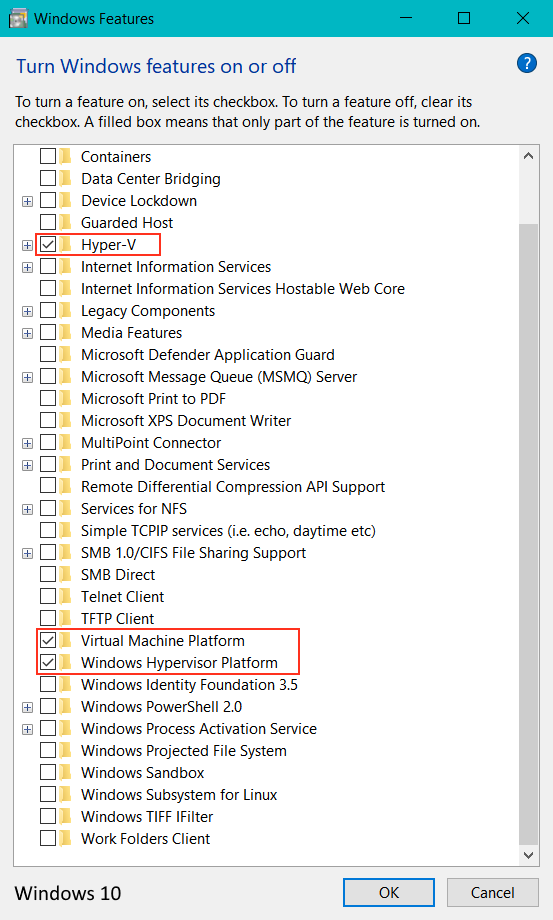
o To do so, click on Start and type Turn Windows Features on or off. In Windows 11, open the Run dialog box (Win+R) and type optionalfeatures.exe
o Enable Hyper-V, Virtual Machine Platform and Windows Hypervisor Platform and restart.
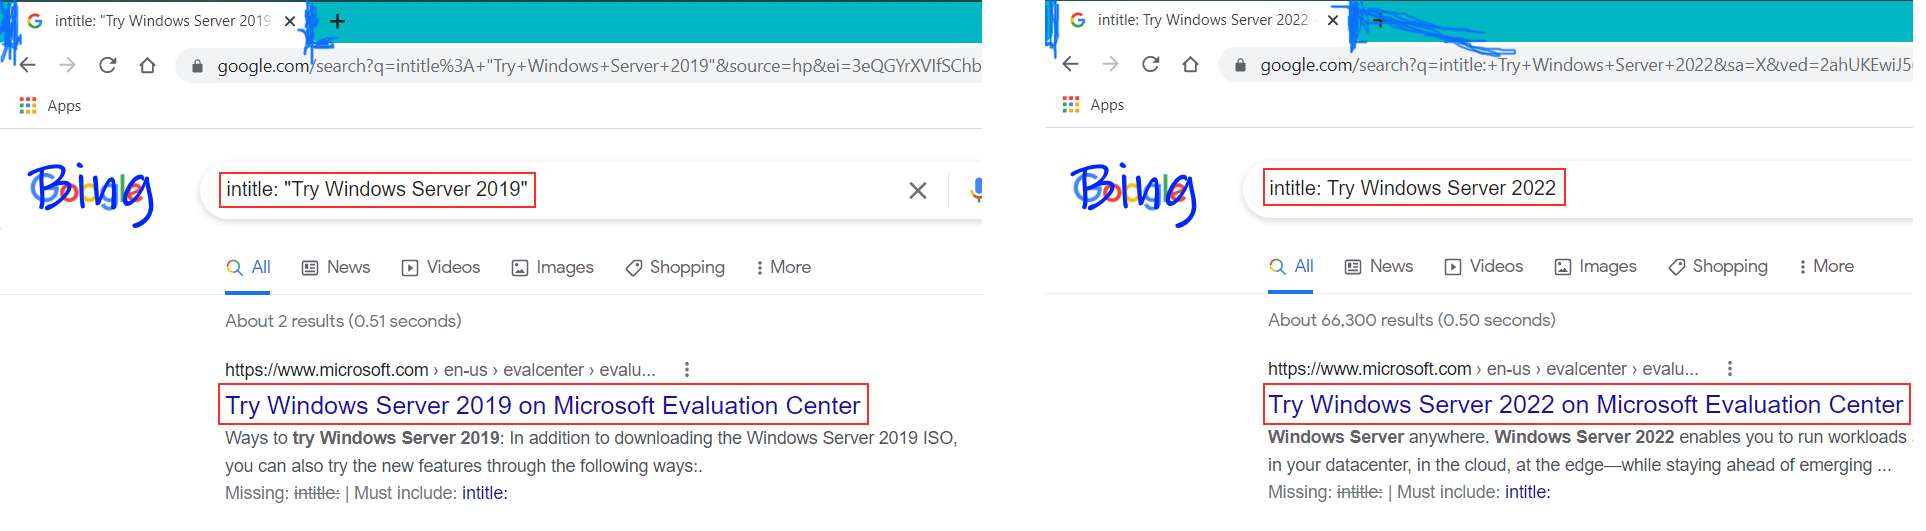
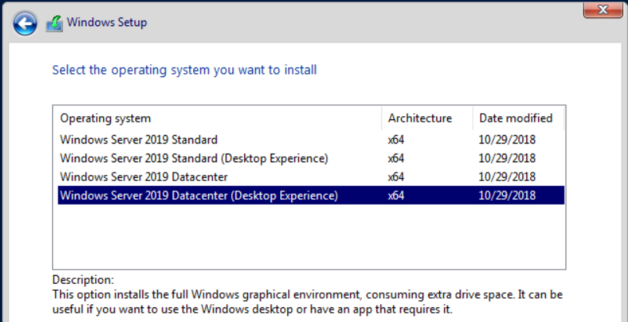
Download Windows Server 2019/2022 Evaluation
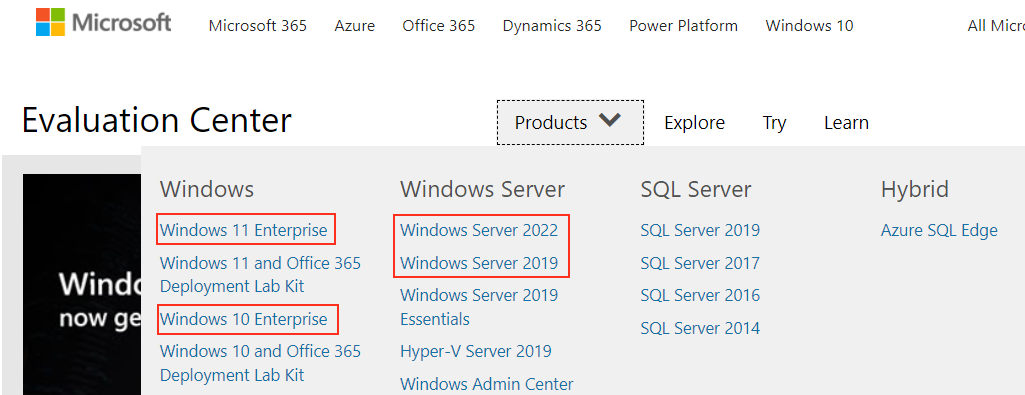
Download Windows 10/Windows 11 Enterprise Evaluation
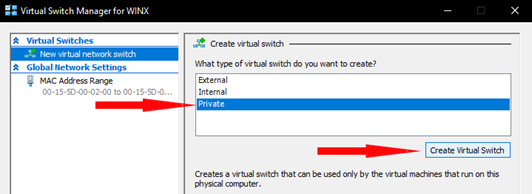
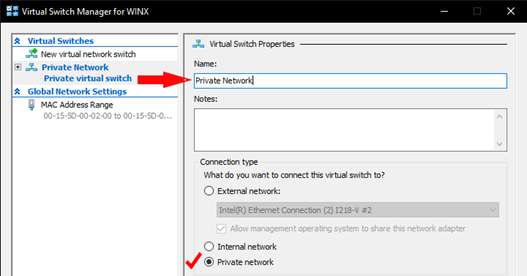
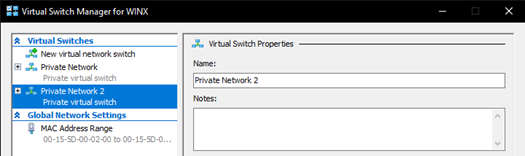
STEP 2: Get your Networking on…
Create some Layer 2 switches for the Virtual Machines to connect to using the Hyper-V Virtual Switch Manager.
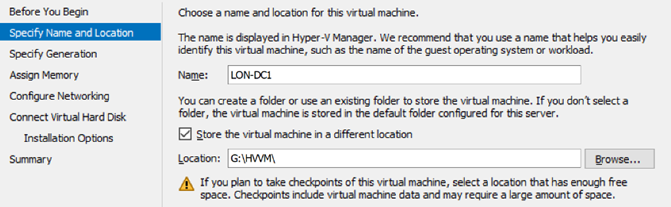
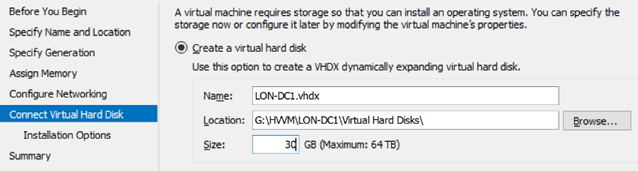
Now let’s create some Virtual Machines (VMs). The following virtual machines (highlighted in red) will need to be created, all the rest are optional;
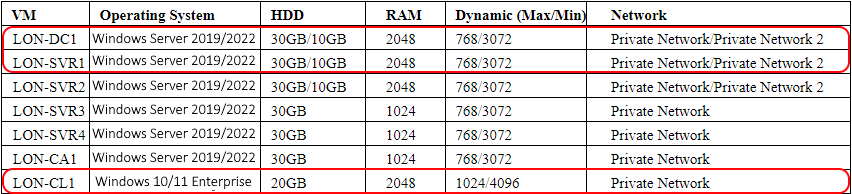
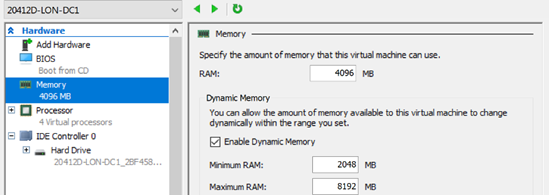
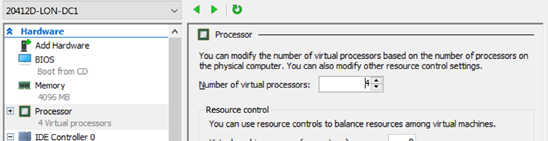
You may need to adjust the specifications to meet your own individual resources and requirements.
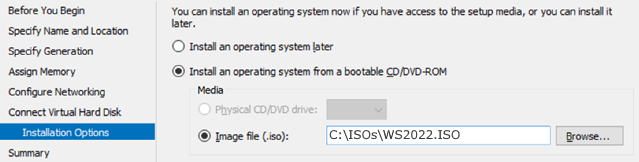
Now we can start installing OSes and configuring the Virtual Machines.
If you wish, you may now start installing the other VMs, but note that multiple, simultaneous installations will undoubtedly, negatively impact host computer resources, especially where they are limited.
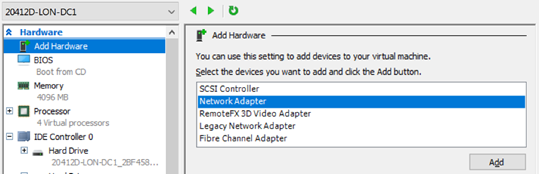
First things, first. We’ll perform post-installation configuration and the install some key roles.
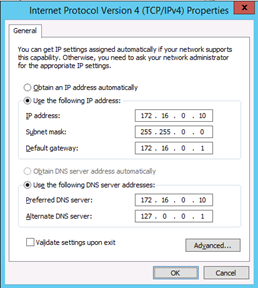
The 1.Internal NICs on LON-DC1, LON-SVR1, LON-SVR2 and LON-CL1 will have the following IP settings:
| LON-DC1 | LON-SVR1 | LON-SVR2 | LON-CL1 | |
|---|---|---|---|---|
| IP: | 172.16.0.10 | 172.16.0.21 | 172.16.0.22 | 172.16.0.50 |
| SM: | 255.255.0.0 | 255.255.0.0 | 255.255.0.0 | 255.255.0.0 |
| Pri DNS: | 172.16.0.10 | 172.16.0.10 | 172.16.0.10 | 172.16.0.10 |
| Sec DNS: | 127.0.0.1 | Blank | Blank | Blank |
| LON-DC1 | LON-SVR1 | LON-SVR2 | |
|---|---|---|---|
| IP: | 131.107.0.1 | 131.107.0.21 | 131.107.0.22 |
| SM: | 255.255.0.0 | 255.255.0.0 | 255.255.0.0 |
HINT! To identify which NIC is connected to the (Internal) “Private Network”, in Hyper-V Manager, select the LON-DC1 VM, click on Settings and click on one of Network Adapter and under Virtual switch choose Not connected. The corresponding NIC in the VM should respond with Network cable unplugged. Don't forget to reconnect the NICs...
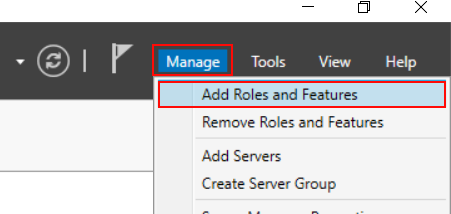
In Server Manager, in the top right-hand section, click on Manage, then Add Roles and Features.
Click Next to accept the defaults for the the next three screens... Before you begin, Installation Type (Role-based or feature-based installation) and Server Selection (Select a server from the server pool).
In the Select server roles screen, click on the checkbox and select Active Directory Domain Services. A new pop-up box opens asking you whether you would like to Accept features that are required for Active Directory Domain Services?
The same pop-up box appears when you click on DHCP Server and DNS Server. Click on Accept for all three roles.
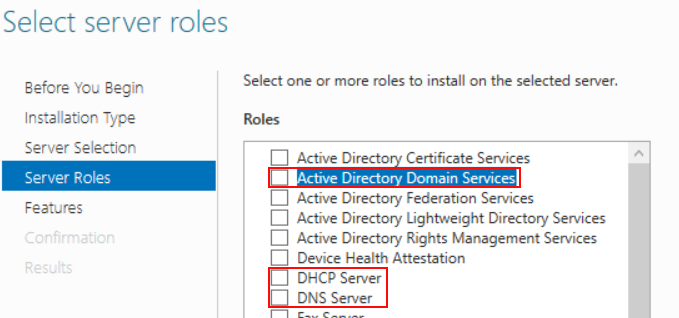
Accept the pop-up defaults for Role Services installation options.
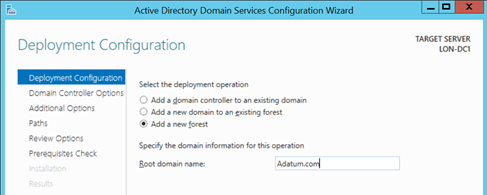
Now we'll go ahead and complete the promotion of LON-DC1 to a domain controller.

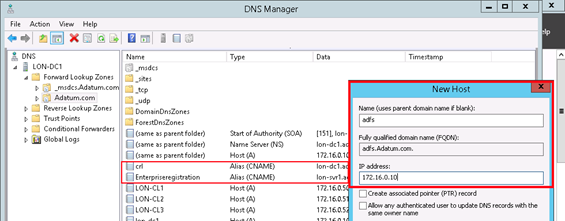
| Record | Value | Record Type |
|---|---|---|
| adfs | 172.16.0.10 | Host (A) |
| crl | lon-dc1.adatum.com | Alias (CNAME) |
| EnterpriseRegistration | lon-svr1.adatum.com | Alias (CNAME) |
Name:
Adatum.com
Address Pool:
Start IP: 172.16.0.160
End IP: 172.16.0.190
Scope Options:
003
Router
172.16.0.1
006
DNS Server
172.16.0.10
015
Domain Name
Adatum.com
The installation of Active Directory Certificate Services (ADCS) is OPTIONAL, so feel free to skip this whole section 9.
IMPORTANT...
Yeah! PowerShell BABY!
Next, let’s see how to do all that using Windows PowerShell…
In half the time! Power’s Hell!
Am-I-right!?
Note: Most issues will arise from either:
(a) Not running PowerShell as Administrator. Right-click on PowerShell and Run as Administrator. Or,
(b) Your ExecutionPolicy is set to Restricted. Run the cmdlet: Set-ExecutionPolicy RemoteSigned.
If you are using Windows Server 20xx as the OS for the physical virtualization host, run the following cmdlet first;
To speed things up, you can copy and paste all the cmdlets into PowerShell...ON YOUR PHYSICAL/VIRTUALIZATION HOST!
STEP 1: Grab some ISOs
Make sure you have the path location created (x:\ISOs; where x=your drive), grabbed some ISOs and placed them in the $Path location. For example, $Path = C:\ISOs
You don't need PowerShell for this, but say that you did (I don't know how long these links will last...Correct as of 20 Sep 2024.):
For Windows 10 Enterprise:
Invoke-WebRequest -UseBasicParsing -URI https://software-download.microsoft.com/download/sg/444969d5-f34g-4e03-ac9d-1f9786c69161/19044.1288.211006-0501.21h2_release_svc_refresh_CLIENTENTERPRISEEVAL_OEMRET_x64FRE_en-gb.iso -Method GET -OutFile $Path\Win10EntEval.iso
For Windows 11 Enterprise:
Invoke-WebRequest -UseBasicParsing -URI https://software-download.microsoft.com/download/sg/888969d5-f34g-4e03-ac9d-1f9786c66749/22000.318.211104-1236.co_release_svc_refresh_CLIENTENTERPRISEEVAL_OEMRET_x64FRE_en-gb.iso -Method GET -OutFile $Path\Win11EntEval.iso
For Windows Server 2019 Datacenter:
Invoke-WebRequest -UseBasicParsing -URI https://software-download.microsoft.com/download/pr/17763.737.190906-2324.rs5_release_svc_refresh_SERVER_EVAL_x64FRE_en-us_1.iso -Method GET -OutFile $Path\WS2019Eval.iso
For Windows Server 2022 Datacenter:
Invoke-WebRequest -UseBasicParsing -URI https://software-download.microsoft.com/download/sg/20348.169.210806-2348.fe_release_svc_refresh_SERVER_EVAL_x64FRE_en-us.iso -Method GET -OutFile $Path\WS2022Eval.iso
STEP 2: Configure OSI Layer-2 Networking
Create Virtual Switches;
STEP 3: Create Virtual Machines
$Path="x:\HVVM\"; Again, where 'x' is the drive you want the ISOs to be saved in; change as appropriate!
New-VM -Name LON-DC1 -Path ($Path+'LON-DC1') -MemoryStartupBytes 2GB -NewVHDPath ($Path+'LON-DC1\Virtual Disks\LON-DC1.vhdx') -NewVHDSizeBytes 30GB -SwitchName 'SUBNET_A' -Generation 2
New-VM -Name LON-SVR1 -Path ($Path+'LON-SVR1') -MemoryStartupBytes 2GB -NewVHDPath ($Path+'LON-SVR1\Virtual Disks\LON-SVR1.vhdx') -NewVHDSizeBytes 30GB -SwitchName 'SUBNET_A' -Generation 2
New-VM -Name LON-CL1 -Path ($Path+'LON-CL1 -MemoryStartupBytes 2GB -NewVHDPath ($Path+'LON-CL1\Virtual Disks\LON-CL1.vhdx') -NewVHDSizeBytes 20GB -SwitchName 'SUBNET_A' -Generation 2
OPTIONAL:
New-VM -Name LON-SVR2 -Path ($Path+'LON-SVR2') -MemoryStartupBytes 2GB -NewVHDPath ($Path+'LON-SVR2\Virtual Disks\LON-SVR2.vhdx') -NewVHDSizeBytes 30GB -SwitchName 'SUBNET_A' -Generation 2
New-VM -Name LON-SVR3 -Path ($Path+'LON-SVR3') -MemoryStartupBytes 1GB -NewVHDPath ($Path+'LON-SVR3\Virtual Disks\LON-SVR3.vhdx') -NewVHDSizeBytes 30GB -SwitchName 'SUBNET_A' -Generation 2
New-VM -Name LON-SVR4 -Path ($Path+'LON-SVR4') -MemoryStartupBytes 1GB -NewVHDPath ($Path+'LON-SVR4\Virtual Disks\LON-SVR4.vhdx') -NewVHDSizeBytes 30GB -SwitchName 'SUBNET_A' -Generation 2
New-VM -Name LON-CA1 -Path ($Path+'LON-CA1') -MemoryStartupBytes 1GB -NewVHDPath ($Path+'LON-CA1\Virtual Disks\LON-CA1.vhdx') -NewVHDSizeBytes 30GB -SwitchName 'SUBNET_A' -Generation 2
Create second hard drives for LON-DC1, LON-SVR1 and LON-SVR2 and attach them;
Configure Processors;
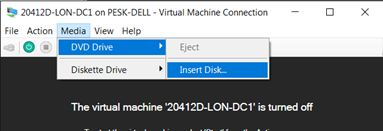
Configure Virtual Machines to start from DVD (.iso);
** Remember to change WS20xxEval.ISO and Win1xEntEval.ISO in the path to the correct ISOs you downloaded. E.g. '$Path\WS20xxEval.iso' to '$Path\WS2019Eval.iso' **
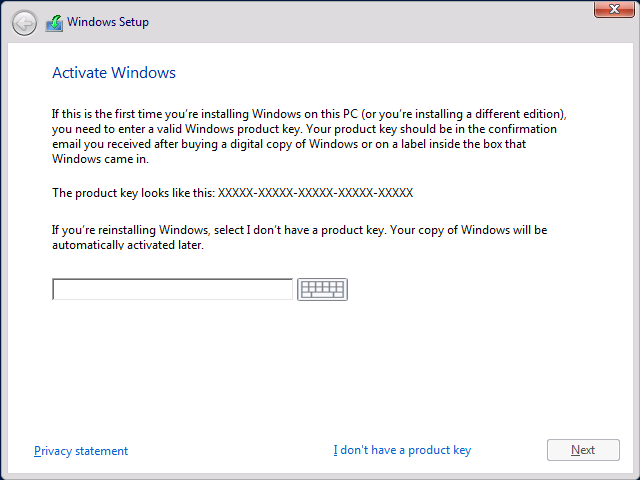
STEP 4: Now start the Virtual Machines and install Windows. You don't need PowerShell for that!
But, say that you wanted to...
Verify that the VMs are running:
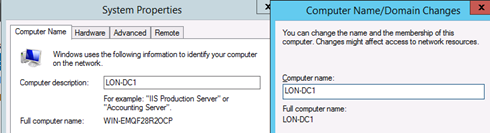
Change the computer names. From the physical/virtualization host...
First, commit to memory (variables), local and domain credentials, for use throughout...
Invoke-Command -VMName 'LON-DC1' -ScriptBlock{Rename-Computer -NewName 'LON-DC1' -LocalCredential $Cred1 -Force -Restart}
Invoke-Command -VMName 'LON-SVR1' -ScriptBlock{Rename-Computer -NewName 'LON-SVR1' -LocalCredential $Cred1 -Force -Restart}
Invoke-Command -VMName 'LON-CL1' -ScriptBlock{Rename-Computer -NewName 'LON-CL1' -LocalCredential $Cred1 -Force -Restart}
OPTIONAL:
Invoke-Command -VMName 'LON-SVR2' -ScriptBlock{Rename-Computer -NewName 'LON-SVR2' -LocalCredential $Cred1 -Force -Restart}
Invoke-Command -VMName 'LON-SVR3' -ScriptBlock{Rename-Computer -NewName 'LON-SVR3' -LocalCredential $Cred1 -Force -Restart}
Invoke-Command -VMName 'LON-SVR4' -ScriptBlock{Rename-Computer -NewName 'LON-SVR4' -LocalCredential $Cred1 -Force -Restart}
Invoke-Command -VMName 'LON-CA1' -ScriptBlock{Rename-Computer -NewName 'LON-CA1' -LocalCredential $Cred1 -Force -Restart}
STEP 5: Configure Windows IP and Networking settings. Again, PowerShell, no!
But, again, say that you wanted to...
From the physical/virtualization host...
Clear the variable for reuse. Wash, Rinse, Repeat for LON-SVR1 and LON-SVR2...
Clear-Variable -Name IfIndex
$IfIndex = Invoke-Command -VMName 'LON-SVR1' -Credential $Cred1 -ScriptBlock {Get-NetAdapter | Select -ExpandProperty ifIndex -First 1
Invoke-Command -VMName 'LON-SVR1' -Credential $Cred1 -ScriptBlock {Set-NetIPAddress -InterfaceIndex $ifindex -IPAddress 172.16.0.21 -PrefixLength 24}
Clear-Variable -Name IfIndex
$IfIndex = Invoke-Command -VMName 'LON-CL1' -Credential $Cred1 -ScriptBlock {Get-NetAdapter | Select -ExpandProperty ifIndex -First 1
Invoke-Command -VMName 'LON-CL1' -Credential $Cred1 -ScriptBlock {Set-NetIPAddress -InterfaceIndex $ifindex -IPAddress 172.16.0.50 -PrefixLength 24}
STEP 6: Install AD Domain Services, Promote DC, Configure DNS and DHCP.
Perfect use-case scenario for PowerShell... Again, from the physical/virtualization host...
And now the moment you've been waiting for...
Install the Forest and Promote server to a domain controller.
Create DNS Resource Records;
Authorize the DHCP Server, create the DHCP Scope and set DHCP Scope Options;
Add all other virtual machines to the domain:
NOTE! All hosts are members of the Adatum.com domain, EXCEPT LON-CA1, which is a Standalone Root CA and SHOULD NEVER be connected to the domain!
IP Configuration: (Subnet Mask: 255.255.0.0; Primary DNS Server: 172.16.0.10)
LON-DC1: IP Address: 172.16.0.10; (Note! Primary DNS is ITSELF. Secondary is 127.0.0.1)
This is the Domain Controller, Enterprise Root CA and hosts the Adatum.com domain.
LON-CA1: IP Address: 172.16.0.25; This is a Member Server and Standalone Root CA (Not in the Domain!)
LON-SVR1: IP Address: 172.16.0.21; This is a Member Server in the Adatum.com domain.
LON-SVR2: IP Address: 172.16.0.22; This is a Member Server in the Adatum.com domain.
LON-SVR3: IP Address: 172.16.0.23; This is a Member Server in the Adatum.com domain.
LON-SVR4: IP Address: 172.16.0.24; This is a Member Server in the Adatum.com domain.
LON-CL1: IP Address: 172.16.0.50; This is a Member Client in the Adatum.com domain.
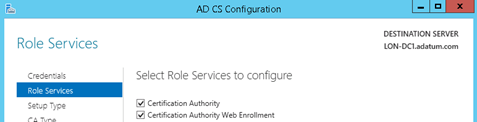
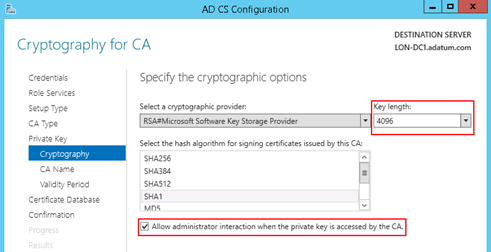
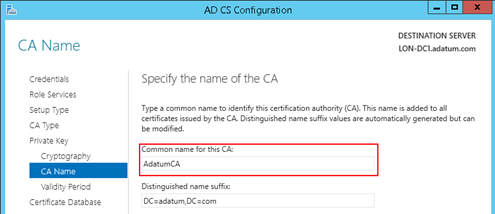
Installation of AD Certificate Services - (NOTE! This section is totally OPTIONAL.)
Once domain configuration is fully complete, and NOT BEFORE, install AD Certificate Services on LON-DC1;
Configure Active Directory Certificate Services
On LON-DC1;
...AND...Stick a fork in it, you're done! Ah, yes. The script...
Verify the HASH signatures...
In PowerShell; Get-FileHash %Userprofile%\Desktop\CreateYourHyperVLab.ps1 -Algorithm RIPEMD160 | SHA256 | SHA384 | SHA512 (Choose one)
Save the file on your desktop and from the Run dialog box:
PowerShell %Userprofile%\Desktop\CreateYourHyperVLab.ps1
Enjoy your newly minted lab!